안녕하세요 오늘은 Spring Boot에서 JPA를 공부하면 직접 사용해 보도록 하겠습니다.
참고로 사용함에 있어 아주 기본적이고 간단하게 사용하는 부분만 작성되어 추가적인 부분이 많이 생략될 수 있습니다.
JPA를 찾아보면 영속성(Persistence), ORM(Object Relational Mapping 객체-관계 맵핑) 관련한 내용들은 쉽게 접할 수 있습니다.
영속성(Persistence)
데이터를 생성한 프로그램이 종료되더라도 사라지지 않는 데이터의 특성을 말한다.
영속성을 갖지 않는 데이터는 메모리상에서 존재하기 때문에 프로그램이 종료되면 데이터는 사라지게 된다.
비유해서 말하면 메모장에서 글을 작성하고 저장하지 않은 상태에서 메모장을 종료하면 메모장에 내용은 사라지게 되죠?
저장하지 않은 상태에서 종료하면 글의 내용들은 영속성을 갖지 못하고 사라지게 됩니다. 하지만 정상적으로 메모장에 내용을 저장하면 파일로 남아 있습니다. 메모장을 종료하더라도 해당 내용은 다시 불러올 수 있죠 영속성을 가지고 있는 데이터라고 볼 수 있습니다.
ORM(Object Relational Mapping)
객체와 관계형 데이터베이스를 자동으로 매핑합니다.
객체사용으로 관계형 데이터베이스를 다룰 수 있습니다.
ORM을 통해 SQL문을 직접 생성하지 않고 데이터 영속성을 보다 직관적인 코드(메서드)를 통해 데이터를 다룰 수 있습니다.
JPA (Java Persistence API)
자바로 ORM을 사용하기 위한 인터페이스를 집합
JAP를 사용해 객체와 데이터베이스 간에 맵핑이 가능하고
데이터를 자바코드를 통해 데이터베이스에 적재, 조회등 사용가능하도록 합니다.
그럼 이제 Spring Boot를 통해 JPA를 상용해 보겠습니다.
저는 mysql를 데이터베이스를 사용하여 만들어 봤습니다.
STEP1 Spring Boot 프로젝트의 의존성 추가
저는 Spring Boot프로젝트 Gradle 가반으로 생성하여 build.gradle 파일 안에 dependencies를 추가했습니다.
dependencies에서 org.springframework.boot:spring-boot-starter-data-jpa, mysql:mysql-connector-java, com.zaxxer:HikariCP, org,projectlombok:lombok을 추가해 줍니다.
dependencies {
    implementation 'org.springframework.boot:spring-boot-starter'
    implementation 'org.springframework.boot:spring-boot-starter-web'
    implementation 'org.springframework.boot:spring-boot-starter-data-jpa' // Spring Boot 에서 제공하느 JPA 라이브러리 (추가)
    implementation 'mysql:mysql-connector-java:8.0.33'// mysql 연결 라이브러리 (추가)
    implementation 'com.zaxxer:HikariCP:3.4.1' // connection pool를 관리하는 라이브러리 (추가)
    compileOnly 'org.projectlombok:lombok' // lombok (추가)

    developmentOnly 'org.springframework.boot:spring-boot-devtools'
    annotationProcessor 'org.projectlombok:lombok'  // lombok (추가)
    testImplementation 'org.springframework.boot:spring-boot-starter-test'
}
STEP2 application.properties 설정 정보 추가
jdbc-url의 경우
jdbc:mysql://localhost:3306/{스키마이름}?serverTimezone=UTC&characterEncoding=UTF-8
저는 스키마 이름을 exp로 만들어서 아래와 같이 설정했습니다.
username, password도 설정하신 DB의 정보를 기입해 주시면 됩니다.
참고로 저는 mysql를 DB를 상용해였기에 드라이버 클래스 이름이 com.mysql.cj.jdbc.Driver 입니다.
자동 커밋은 false로 설정하여 작업했습니다.
spring.datasource.driver-class-name=com.mysql.cj.jdbc.Driver
spring.datasource.jdbc-url=jdbc:mysql://localhost:3306/exp?serverTimezone=UTC&characterEncoding=UTF-8
spring.datasource.username=root
spring.datasource.password=0000
spring.datasource.hikari.auto-commit=false
STEP3 DataSource 만들기
DatabaseConfig.java를 만들고 DataSource를 Bean을 만들어 줍니다.
HikariDataSource를 만들어 줍니다.
추가적으로 구성하는 설정들이 있지만 지금은 JPA를 사용하기 위한 최소한의 구성합니다.
@ConfigurationProperties("spring.datasource") 를 사용해 application properties의 spring.datasource 부분을 읽어
자동적으로 설정합니다.
import com.zaxxer.hikari.HikariDataSource;
import org.springframework.boot.context.properties.ConfigurationProperties;
import org.springframework.boot.jdbc.DataSourceBuilder;
import org.springframework.context.annotation.Bean;
import org.springframework.context.annotation.Configuration;


@Configuration
public class DatabaseConfig {
    @Bean
    @ConfigurationProperties("spring.datasource")
    public HikariDataSource dataSource() {
        return DataSourceBuilder.create().type(HikariDataSource.class).build();
    }

}
STEP4 Database 테이블 만들기
아래의 만들어 놓은 DDL를 mysql에서 실행합니다.
그럼 테이블이 생성된 걸 알 수 있습니다.
(
id varchar(20) not null comment '사용자 아이디',
pw varchar(255) not null comment '사용자 패스워드',
nm varchar(20) null comment '사용자 이름',
constraint tb_member_pk
primary key (id)
);

STEP5 Entity, DTO 만들기
데이터베이스 테이블과 맵핑될 entity객체를 만들어 줍니다.
구성을 확인하면 위에서 만든 데이터베이스 테이블과 맵핑될 걸 알 수 있습니다.
어노테이션 @entity를 사용해서 entity객체임을 명시해 주고 @Id로 컬럼의 PK를 잡아줍니다.
import lombok.*;

import javax.persistence.Entity;
import javax.persistence.Id;
import javax.persistence.Table;

@Entity
@Table(name = "tb_member")
@Getter
@Setter
@Builder
@NoArgsConstructor
@AllArgsConstructor
public class MemberEntity {
    @Id
    String id;
    String pw;
    String nm;

}
request 통신을 위한 데이터 전송 객체를 만들어 줍니다.
DTO와 Entity의 구성을 보면 매우 유사한 걸 알 수 있습니다.
실제로 DTO는 client의 간에 데이터를 주고받기 위한 객체입니다. 실제 프로젝트에서는 Entity구성과 다를 수 있습니다.
DTO에서 받은 객체를 toEntity 메서드를 구성해서 buillder로 DTO 객체를 Entity 객체로 만들어줍니다.
import lombok.AllArgsConstructor;
import lombok.Getter;
import lombok.NoArgsConstructor;

@Getter
@NoArgsConstructor
@AllArgsConstructor
public class MemberDto {

    String id;
    String pw;
    String nm;

    public MemberEntity toEntity() {
        return MemberEntity.builder()
                .id(getId())
                .pw(getPw())
                .nm(getNm())
                .build();
    }
}
STEP6 MemberRepository 만들기
MemberRepository 인터페이스를 만들고 CrudRepository를 상속합니다.
CrudRepository는 기본적인 Crud의 대한 인터페이스를 구성되어 있습니다.
CrudRepository<Entity객체 클래스, Entity 객체 id 데이터 타입>으로 넣어줍니다.
저는 기본적인 CRUD를 테스트하기 위해 만들어서 추가적으로 작성하지 않았습니다.
추가적인 작업이 필요한 경우 MemberRepository에 추가하시면 됩니다.
import org.springframework.data.repository.CrudRepository;

public interface MemberRepository extends CrudRepository<MemberEntity, String> {
}
CrudRepository의 클래스 내용입니다.
기본적으로 제공되는 인터페이를 확인할 수 있습니다.
import java.util.Optional;

import org.springframework.dao.OptimisticLockingFailureException;

/**
 * Interface for generic CRUD operations on a repository for a specific type.
 *
 * @author Oliver Gierke
 * @author Eberhard Wolff
 * @author Jens Schauder
 */
@NoRepositoryBean
public interface CrudRepository<T, ID> extends Repository<T, ID> {

	/**
	 * Saves a given entity. Use the returned instance for further operations as the save operation might have changed the
	 * entity instance completely.
	 *
	 * @param entity must not be {@literal null}.
	 * @return the saved entity; will never be {@literal null}.
	 * @throws IllegalArgumentException in case the given {@literal entity} is {@literal null}.
	 * @throws OptimisticLockingFailureException when the entity uses optimistic locking and has a version attribute with
	 *           a different value from that found in the persistence store. Also thrown if the entity is assumed to be
	 *           present but does not exist in the database.
	 */
	<S extends T> S save(S entity);

	/**
	 * Saves all given entities.
	 *
	 * @param entities must not be {@literal null} nor must it contain {@literal null}.
	 * @return the saved entities; will never be {@literal null}. The returned {@literal Iterable} will have the same size
	 *         as the {@literal Iterable} passed as an argument.
	 * @throws IllegalArgumentException in case the given {@link Iterable entities} or one of its entities is
	 *           {@literal null}.
	 * @throws OptimisticLockingFailureException when at least one entity uses optimistic locking and has a version
	 *           attribute with a different value from that found in the persistence store. Also thrown if at least one
	 *           entity is assumed to be present but does not exist in the database.
	 */
	<S extends T> Iterable<S> saveAll(Iterable<S> entities);

	/**
	 * Retrieves an entity by its id.
	 *
	 * @param id must not be {@literal null}.
	 * @return the entity with the given id or {@literal Optional#empty()} if none found.
	 * @throws IllegalArgumentException if {@literal id} is {@literal null}.
	 */
	Optional<T> findById(ID id);

	/**
	 * Returns whether an entity with the given id exists.
	 *
	 * @param id must not be {@literal null}.
	 * @return {@literal true} if an entity with the given id exists, {@literal false} otherwise.
	 * @throws IllegalArgumentException if {@literal id} is {@literal null}.
	 */
	boolean existsById(ID id);

	/**
	 * Returns all instances of the type.
	 *
	 * @return all entities
	 */
	Iterable<T> findAll();

	/**
	 * Returns all instances of the type {@code T} with the given IDs.
	 * <p>
	 * If some or all ids are not found, no entities are returned for these IDs.
	 * <p>
	 * Note that the order of elements in the result is not guaranteed.
	 *
	 * @param ids must not be {@literal null} nor contain any {@literal null} values.
	 * @return guaranteed to be not {@literal null}. The size can be equal or less than the number of given
	 *         {@literal ids}.
	 * @throws IllegalArgumentException in case the given {@link Iterable ids} or one of its items is {@literal null}.
	 */
	Iterable<T> findAllById(Iterable<ID> ids);

	/**
	 * Returns the number of entities available.
	 *
	 * @return the number of entities.
	 */
	long count();

	/**
	 * Deletes the entity with the given id.
	 * <p>
	 * If the entity is not found in the persistence store it is silently ignored.
	 *
	 * @param id must not be {@literal null}.
	 * @throws IllegalArgumentException in case the given {@literal id} is {@literal null}
	 */
	void deleteById(ID id);

	/**
	 * Deletes a given entity.
	 *
	 * @param entity must not be {@literal null}.
	 * @throws IllegalArgumentException in case the given entity is {@literal null}.
	 * @throws OptimisticLockingFailureException when the entity uses optimistic locking and has a version attribute with
	 *           a different value from that found in the persistence store. Also thrown if the entity is assumed to be
	 *           present but does not exist in the database.
	 */
	void delete(T entity);

	/**
	 * Deletes all instances of the type {@code T} with the given IDs.
	 * <p>
	 * Entities that aren't found in the persistence store are silently ignored.
	 *
	 * @param ids must not be {@literal null}. Must not contain {@literal null} elements.
	 * @throws IllegalArgumentException in case the given {@literal ids} or one of its elements is {@literal null}.
	 * @since 2.5
	 */
	void deleteAllById(Iterable<? extends ID> ids);

	/**
	 * Deletes the given entities.
	 *
	 * @param entities must not be {@literal null}. Must not contain {@literal null} elements.
	 * @throws IllegalArgumentException in case the given {@literal entities} or one of its entities is {@literal null}.
	 * @throws OptimisticLockingFailureException when at least one entity uses optimistic locking and has a version
	 *           attribute with a different value from that found in the persistence store. Also thrown if at least one
	 *           entity is assumed to be present but does not exist in the database.
	 */
	void deleteAll(Iterable<? extends T> entities);

	/**
	 * Deletes all entities managed by the repository.
	 */
	void deleteAll();
}
STEP7 MemberService 만들기
MemberRepository를
MemberRepository의 메서드를 호출하게 되면 Entity의 객체가 JPA의 ORM기술을 통해 데이터베이스의 맵핑되고
SQL문을 생성하여 데이터베이스에 실행됩니다.
저는 기본적인 CRUD의 내용만 구성했습니다.
import org.springframework.beans.factory.annotation.Autowired;
import org.springframework.stereotype.Service;

import javax.transaction.Transactional;
import java.util.List;

@Service
@Transactional
public class MemberService {

    @Autowired
    MemberRepository memberRepository;

    /**
     * 고객 등록
     *
     * @param memberEntity 고객 데이터 Entity
     */
    void save(MemberEntity memberEntity) {
        memberRepository.save(memberEntity);
    }

    /**
     * 고객 정보 전체 조회
     *
     * @return List<MemberDomain> 고객 정보 리스트
     */
    List<MemberEntity> findAll() {
        return (List<MemberEntity>) memberRepository.findAll();
    }

    /**
     * 고객 정보  조회
     *
     * @return MemberDomain 고객 정보 Entity
     */
    MemberEntity findById(String id) {
        return memberRepository.findById(id).orElse(null);
    }

    /**
     * 고객 정보 업데이트
     *
     * @param memberEntity 고객 데이터 Entity
     */
    void update(MemberEntity memberEntity) {
        MemberEntity updateMemberEntity = findById(memberEntity.getId());
        updateMemberEntity.setNm(memberEntity.getNm());
        updateMemberEntity.setPw(memberEntity.getPw());
        save(updateMemberEntity);
    }

    /**
     * 고객 정보 업데이트
     *
     * @param id 고객 아이디
     */
    void delete(String id) {
        memberRepository.deleteById(id);
    }
}
STEP7 MemberController 만들기
서비스 구성까지 마치면 이제 Controller를 구성합니다.
Controller는 client의 요청을 받아 처리하는 클래스입니다.
client에서 고객 등록을 요청하면 Controller가 받아서 Service 클래스에 전달해 줍니다.
Service클래스는 비즈니스 로직을 처리하는 클래스입니다.
Service 클래스에서 받은 데이터를 처리하는 과정에서 데이터베이스의 접근이 필요한 경우 Repository를 통해 다룰 수 있습니다.
client -> Controller -> Service -> Repository
의 흐름으로 요청으로부터 데이터베이스에 접근됩니다.
이제 Controller도 구성했으니 테스트하겠습니다.
import org.springframework.beans.factory.annotation.Autowired;
import org.springframework.http.HttpEntity;
import org.springframework.web.bind.annotation.*;

@RestController
public class MemberController {

    @Autowired
    MemberService memberService;

    /**
     * 고객 등록
     *
     * @param memberDto 고객 데이터 전송 객체
     * @return HttpEntity<?> 응답데이터
     */
    @RequestMapping(path = "api/v1/members", method = RequestMethod.POST)
    public HttpEntity<?> save(@RequestBody MemberDto memberDto) {
        memberService.save(memberDto.toEntity());
        return new HttpEntity<>("고객정보 등록 성공", null);
    }

    /**
     * 고객 전체 조회
     *
     * @return HttpEntity<?> 응답데이터
     */
    @RequestMapping(path = "api/v1/members", method = RequestMethod.GET)
    public HttpEntity<?> findAll() {
        return new HttpEntity<>(memberService.findAll());
    }

    /**
     * 고객 조회
     *
     * @param id 고객 아이디
     * @return HttpEntity<?> 응답데이터
     */
    @RequestMapping(path = "api/v1/members/{id}", method = RequestMethod.GET)
    public HttpEntity<?> findById(@PathVariable("id") String id) {
        return new HttpEntity<>(memberService.findById(id));
    }

    /**
     * 고객 정보 업데이트
     *
     * @param memberDto 고객 데이터 전송 객체
     * @return HttpEntity<?> 응답데이터
     */
    @RequestMapping(path = "api/v1/members", method = RequestMethod.PUT)
    public HttpEntity<?> update(@RequestBody MemberDto memberDto) {
        memberService.update(memberDto.toEntity());
        return new HttpEntity<>("고객 정보 업데이트 성공", null);
    }

    /**
     * 고객 정보 삭제
     *
     * @param memberDto 고객 데이터 전송 객체
     * @return HttpEntity<?> 응답데이터
     */
    @RequestMapping(path = "api/v1/members", method = RequestMethod.DELETE)
    public HttpEntity<?> delete(@RequestBody MemberDto memberDto) {
        memberService.delete(memberDto.getId());
        return new HttpEntity<>("고객정보 삭제 성공", null);
    }
}
이제 모든 준비가 완료됐습니다.
Spring Boot 서버를 구동하겠습니다.
서버를 구동하면 문제없이 정상적으로 구동된 걸 확인할 수 있습니다.

STEP8 결과 확인
작업이 완료된 후 Spring Boot를 구동합니다.
그다음 Postman 프로그램을 통해 요청을 해보도록 하겠습니다.
controller의 requestMapping정보를 확인하여 요청하면 됩니다.
고객등록(create) POST

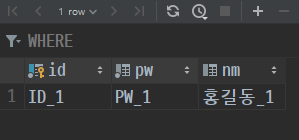
고객정보 등록 성공이라는 메시지가 왔으며 실제 데이터베이스에도 추가된 걸 확인할 수 있습니다.
다음은 조회를 하겠습니다.
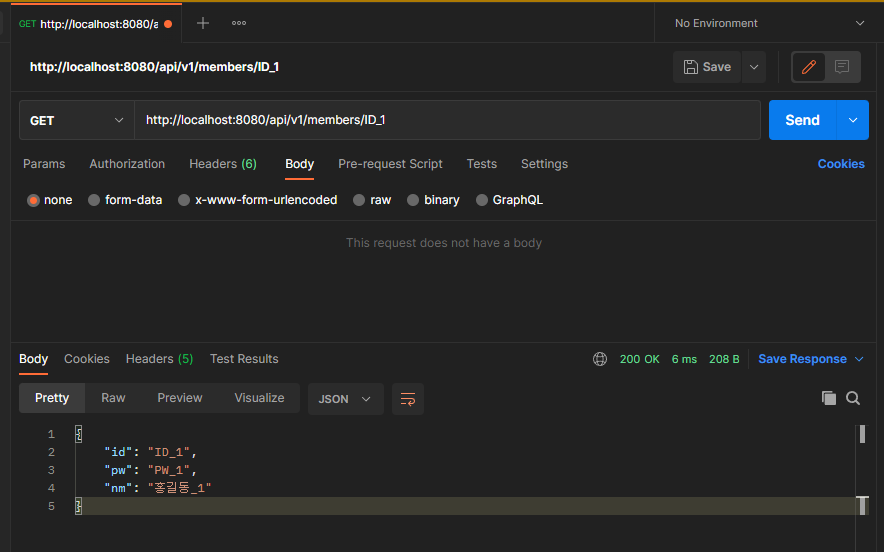
고객조회(read) GET
고객정보를 단건으로 조회 함으로 api/v1/members/{id}에 id 부분으로 등록한 Id 값을 넣어 찾아오는 걸 확인할 수 있습니다.
id 값을 넣지 않고 조회할 경우 전체 데이터를 리스트로 확인할 수 있습니다.

고객수정(update) PUT
고객정보 중 pw, nm의 내용 수정요청 했습니다.

데이터베이스 테이블을 확인하면 변경되었음을 확인할 수 있습니다.

고객삭제(delete) DELETE
고객 ID를 통해 데이터베이스 테이블에서 매칭되는 row를 삭제합니다.
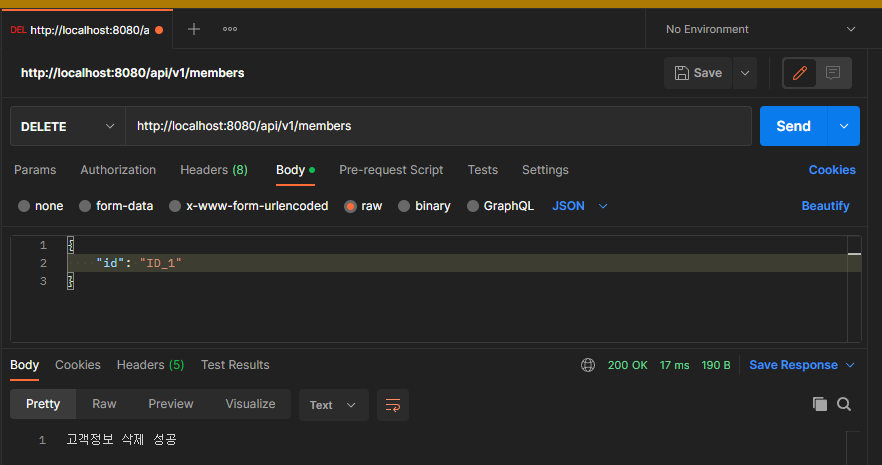
데이터베이스 상에서도 데이터가 삭제되었음을 확인할 수 있습니다.

이렇게 오늘은 Spring Boot에서 JPA를 사용하는 방법을 확인했습니다.
아직 JPA의 기술에 대해 많이 부족하고 배우는 단계라 내용에 있어 부족함이 있을 수 있습니다.
참고해 주시기 바랍니다.
JPA가 아닌 MyBatis 사용하는 방법이 궁금하시다면 아래의 링크를 통해 구성할 수 있습니다.
Spring Boot MyBatis 로 MySql 연동하기 Gradle
안녕하세요. 오늘은 Spring Boot에서 MyBatis 라이브러리를 이용해 MySql 연동 방법을 알아볼게요 우선 Spring Boot 프로젝트를 생성해 주세요. 프로젝트 생성은 생략하고 넘어가도록 할게요 저는 Gradle로
devncj.tistory.com
'dev > Spring Boot' 카테고리의 다른 글
| JEUS JNI Native Library so 파일 적용기 (112) | 2024.05.16 |
|---|---|
| Spring Boot 다국어 Message 사용 (8) | 2023.07.20 |
| [오라클]Oracle DB XE 무료버전 설치 및 설치 오류 방법 (2) | 2022.12.06 |
| Spring Boot MyBatis 로 MySql 연동하기 Gradle (5) | 2021.08.07 |